Showing posts with label Vegetables. Show all posts

May 26, 2012


This recipe is delicious, very flavorful and so easy to make. It certainly makes a nice presentation because of the color! I have been trying and trying to find a good recipe that uses sugar snap peas. I found a recipe (see bottom) that sent my recipe juices flowing. My recipe is similar with a few (ok maybe a lot) changes. We all really enjoyed this and my sugar snap peas didn’t go to waste. I was afraid they would go bad before I could find a recipe to use them up in. 


Ingredients:
  • 1 4oz can of sliced mushrooms
  • 1 tbs. margarine
  • 1 small onion, thinly sliced
  • 1 tablespoon sesame oil
  • 1/4 pound fresh or frozen sugar snaps peas
  • 3/4 cup water
  • 1 beef bouillon cube
  • 1/4 teaspoon garlic powder
  • 1/4 teaspoon salt
  • 1/4 teaspoon pepper
  • 2 tablespoons of toasted sesame seeds


Directions:
  1. In a skillet Sauté sliced onion in margarine until onion becomes soft.
  2. To the sautéed onion add drained can of mushrooms, sesame oil, sugar snap peas, water beef bouillon cube, garlic powder, salt and pepper
  3. Cover your skillet and steam on a medium heat for 15 to 20 minutes or until liquid has mostly evaporated and sugar snap peas are tender.
Adapted From Original Recipe


Check Out Our Online Recipe Book: www.CafeChatterbox.com

Apr 19, 2012


I have heard so many people say how great Kale Chips are that I have been dying to try them myself.  Last week I was at the farmers market and they had Kale for .75 cents a bunch. I figured I had nothing to lose except .75 cents so why not grab a bunch.

After what seemed like a long process of cleaning, removing steams, and drying the kale was ready to go. I placed the kale on two jelly roll pans and let it bake. The last 5 minutes of the baking process I added cheese. 

I must say that my initial reaction was MEH! It’s OK, but after a few more bites it really grew on me. I actually severed it along with dinner that night to get the reaction of everyone at the table. At first I was met with a lot of apprehension about even trying it. Let’s be honest it’s green and looks like spinach that crunches.

After a few bites everyone was hooked. By the time we left the dinner table there wasn’t one piece of kale left to be had. Now I have heard many many times kale chips being compared to potato chips, but I have to disagree on this one. I loved the kale chips and can’t wait to buy more, but I don’t see them ever replacing potato chips in our home.

My husband even suggested adding different types of cheese or even adding different seasonings. I think garlic would be awesome on this little leaves!

This was a fun experiment and I can’t wait to make them again, but they will never be (to me) as good as potato chips. They are certainly a fun snack to have and keep around the house.

For those of you think “Oh my kid would never try them” you might just be surprised to see those little hand sneaking a kale chip here and there. They really are that good!  

Ingredients:
  • 1 bunch of kale
  • 1 tsp. spray olive oil, vegetable oil (like Pam or Crisco)
  • Shredded Parmesan cheese or a cheese of your choice
  • A few dashes of salt
Directions:
  1. Wash your kale thoroughly to remove any sand or dirt that maybe lying within. Remove any stems that are thick (I used a knife and just followed along the steam to move it). 
  2. Tear each piece of kale into pieces the size of potato chips.
  3. Allow time for your kale to dry very well. (this is important if it’s not dry it won’t get crispy)
  4. When your kale is dry pre heat your oven to 350°F  
  5. Sprays your cookie or jelly roll pan with oil
  6. Place your kale in one single lay in each pan. (You don’t want to double up your pieces or they will not get crispy.) You may have to use multiple pans or make multiple batches in the oven.
  7. Then lightly spray the top of your kale with the oil and sprinkle with salt.
  8. Bake the kale for about 10 minutes then remove and add the cheese. Then proceed to bank another 5 minutes or so until it’s light and crispy.
  9. I will warn you to watch it very carefully because it can burn easily. 
Check Out Our Online Recipe Book: www.CafeChatterbox.com

Jan 4, 2012


I really loved this recipe! My only beef with it is that you can’t really taste the cauliflower because the Brussels sprouts really over power the dish. If you don’t like sprouts you will NOT like this recipe. I happen to love sprouts, but even when we were finishing up the left overs a few days later I thought the sprouts were a little stronger than I like. The bacon takes the cake in this recipe and just makes it into something really special. 

I think you could do so much with the concept of this recipe by changing out the vegetables. I think potatoes and carrots would rock in this sauce!


Ingredients:
  • 2 cups fresh cauliflower florets
  • 2 cups fresh brussels sprouts, quartered
  • 2 bacon strips, chopped
  • 1/2 large sweet onion, chopped
  • 2 garlic cloves, minced
  • 1/8 cup all-purpose flour
  • 3/4 cup milk
  • 1/3 cup half-and-half cream
  • 1/2 teaspoon salt
  • 1/4 teaspoon pepper

Directions:
  1. Place cauliflower and brussels sprouts in a large saucepan and cover with water. Bring to a boil. Cover and cook for 2-3 minutes or until crisp-tender; drain.
  2. Meanwhile, in a large skillet, cook bacon over medium heat until crisp. Remove to paper towels with a slotted spoon; drain, reserving drippings. Sauté onion and garlic in drippings until tender. Stir in flour until blended; gradually add the milk, cream, salt and pepper. Bring to a boil; cook and stir for 2 minutes or until thickened.
  3. Stir in cauliflower mixture and bacon. Transfer to a greased 2-1/2-qt. baking dish. Cover and bake at 375° for 15 minutes.
  4. Uncover and bake, uncovered, for 15-20 minutes. Yield: 8 servings.
Original Source

Check Out Our Online Recipe Book: www.CafeChatterbox.com

Nov 17, 2011


I love roasted vegetables, and for some reason I have grown to really enjoy cabbage. It’s taken awhile to get there, but here I am. It must be the German blood line in me creeping out. I still can’t stomach sauerkraut… maybe someday.

I was looking on Penterest a few days ago and discovered a cabbage recipe I had never thought of and one that was a must try. I wasn’t in favor of the recipe itself so to speak, but I was definitely in favor of the concept of roasting cabbage.

The original recipe called for lemon to be drizzled over the cabbage, but I am not a huge lemon fan. I love the smell of lemon!  I just don’t really care for eating it unless it’s for dessert.

I took the concept of roasting the cabbage and ran with it. I just so happened to have a half head of cabbage that needed to be used up, so the timing was perfect, and so was this recipe!

I love how this roasted cabbage turned out. I had no idea how good it would be in truth it was a shot in the dark, but one well worth taking. This will definitely be a recipe I will be making over and over again! It’s easy, and fantastic!  

Ingredients:
  • ½-1 head of cabbage depending on your needs
  • Olive oil (or any type of oil I used pecan oil)
  • Salt and pepper to taste

Directions:
  1. Pre-heat your oven to 450 degrees
  2. Line a jelly roll pan with tin foil for easy clean up.
  3. Slice cabbage into ½ inch slices and place each slice on your lined pan. Remove most of the stem, but leave enough to insure your pieces would stay together.
  4. Drizzle oil on each side of the cabbage and rub in. As stated in the original recipe you can use a pastry brush to easily spread the oil.
  5. Generously add salt and pepper to each side, then place in the oven.
  6. Bake for 15-20 minutes until the cabbage is brown enough for you. I loved the browner areas, they were bursting with flavor. 
Original Recipe


Check Out Our Online Recipe Book: www.CafeChatterbox.com

Nov 3, 2011


One of my favorite things about carving a pumpkin is roasting the seeds. I love pumpkin seeds. They are nutritious and delicious. I love the nutty flavor! Heck you already paid for the fun of the pumpkin why not get free snacks out of the deal?

  1. I normally start the seed drying process by first washing the seeds well in cool water. Get all of the pumpkin membrane off your seeds. 
  2. It’s important that the seeds are thoroughly dry before you cook then. The dryer they are the crispier they will be.
  3. Line a jellyroll pan with paper towels, and then I spray the paper towels down with Pam or some other kind of spray oil. This will insure they will not stick to the paper towel.  After a few days of allowing them to dry it’s time to bake them. Please note that the drying process will vary based on your climate. It took ours two days. 
  4. After they are dry line a jelly roll pan with tin foil for easy clean up.
  5. Place the pumpkin seeds on the foil. Add one teaspoon of oil (pecan, or vegetable) to the pan. I don’t really recommend olive oil because it will flavor the seeds, but if that’s what you like go for it.
  6. Next you will need to toss the seeds in the oil, and then spread them out. The more evenly spread out they are the better they will crisp up.
  7. Next you can sprinkle salt on them, spices, or anything else that makes you happy. I prefer just salt, but I know other people who will add garlic powder, curry, or even a little cinnamon sugar.
  8. Heat your oven to 325 degrees. The low temperature will insure that they are roasted slowly. You will cook them for around 20 minutes, but it’s important to check them about every five minutes, and stir them each time you check them for an even roasting.
  9. As they are cooking you will start heading popping sounds those are your seeds springing up from the pan, but no worries they don’t jump too high.
  10. Don’t forget to check your seeds about every five minutes to insure they don’t burn. The thickness of the seeds will determine how quickly they will cook, and you don’t want burnt seeds.
  11. Let the holiday season begin!!


Check Out Our Online Recipe Book: www.CafeChatterbox.com

Jun 18, 2011


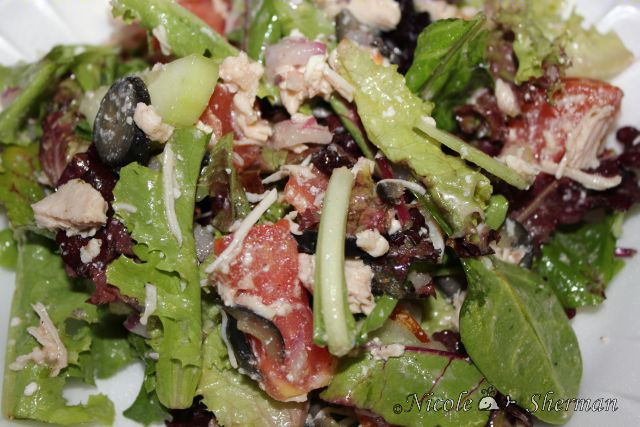
I liked the salad but I was not a fan of the dressing. If you are a huge fan of red wine vinegar then you will love the dressing. It was a little too overwhelming for me. Next time I make this I will just make the salad and use some bottled vinaigrette. Over all the salad is excellent and it's low in calories you get 3 cups for 343 calories! 

Ingredients:
  • 1/3 cup red-wine vinegar
  • 2 tablespoons extra-virgin olive oil
  • 1 tablespoon chopped fresh dill, or oregano or 1 teaspoon dried
  • 1 teaspoon garlic powder
  • 1/4 teaspoon salt
  • 1/4 teaspoon freshly ground pepper
  • 6 cups chopped romaine lettuce
  • 2 1/2 cups chopped cooked chicken, (about 12 ounces; see Tip)
  • 2 medium tomatoes, chopped
  • 1 medium cucumber, peeled, seeded and chopped
  • 1/2 cup finely chopped red onion
  • 1/2 cup sliced ripe black olives
  • 1/2 cup crumbled feta cheese

Directions:
Whisk vinegar, oil, dill (or oregano), garlic powder, salt and pepper in a large bowl. Add lettuce, chicken, tomatoes, cucumber, onion, olives and feta; toss to coat.

Calories Calculated on www.myfitnesspal.com


Original Recipe

Jun 12, 2011


Kevin and I were in the mood for a light meal after a very hot day last week. I racked my brain for something I thought we would both like and was light and healthy at the same time. I decided to recreate a salad I recently had when we were out for lunch one day. I could have just gone and bought one, but I didn’t want to leave the house to do so. I made a few changes to the cheese and salad dressing to bring the calorie count down, and the salad turned out great! We both really enjoyed it.


Serving: 1
Calories: 259
Carbs: 19
Fat: 8
Protein: 13

Ingredients:
  • ¼ cup sliced fresh strawberries
  • ¼ cup fresh blueberries
  • 2 oz. canned chicken 98% fat free
  • 2 cups organic greens
  • 2Tbs wish bone light raspberry walnut vinaigrette dressing
  • ½ oz. mozzarella part skim milk cheese
  • 1Tbs natural raw sliced almonds
Directions:

  1. Place your greens on a plate then layer on top, chicken, cheese, fruit, sliced almonds, then your dressing. 
  2. I personally like to put everything in a large bowl and mix everything up. This helps to spread the dressing throughout the salad. 
  3. Originally I didn’t think this would be enough dressing, but after a good tossing it was perfect! 
Calories Calculated on www.myfitnesspal.com

Apr 15, 2011


One of my favorite cooking shows is Down Home with the Neely’s! I love this husband and wife dynamic duo! They have such amazing chemistry in the kitchen that I find watching their cooking show both educational and entertaining. I saw the Neely’s making spicy sweet potato chips that I later turned into fries and knew I had the try them because I love sweet potato fries and I love spicy. As always they delivered with an amazing recipe that I am in love with. The sweetness of the sweet potatoes paired with the spiciness of just the right spice combination makes these fries a sweet and spicy delight! The only thing I changed from the original recipe was changing them from chips to fries.

Ingredients:

  • Peanut oil, for frying
  • 2 teaspoons kosher salt
  • 1/2 teaspoon ancho chili powder
  • 1/2 teaspoon smoked paprika
  • 1/2 teaspoon garlic powder
  • 1/2 teaspoon freshly ground black pepper
  • 3 large sweet potatoes, well scrubbed

Directions:

In a deep-fryer or heavy-bottomed pot, heat enough oil to come halfway up the sides of the pot, to 350 degrees F.
In a small bowl, mix together salt, chili powder, smoked paprika, garlic powder, and black pepper.
Using a mandoline or a sharp knife, thinly slice the sweet potatoes into 1/8-inch thick rounds. Add the sliced sweet potatoes to the hot oil and fry, in batches, until crisp and golden brown, about 3 minutes. Remove to a paper towel lined sheet tray and immediately sprinkle with the seasoning mixture. Transfer to a serving bowl and serve.

Original Recipe

Jan 13, 2011


Despite what you may be thinking I am not going cabbage crazy we just seemed to have a lot left over after New Year’s so I have been trying to find things to do with cabbage. I hate to waste things. This recipe is really good. The original recipe suggested adding sherry to it, but I found the sherry to make the recipe too strong. Sticking with only chicken broth is a much better option. 


Ingredients:


Directions:

  1.  Heat oil and butter in large heavy and wide saucepan or sauté pan; add cabbage, salt, pepper, and stir over low heat for 5 minutes.
  2.  Add broth (I usually add a bit of sherry, too) and bring to boil, cover and simmer over medium-low heat, stirring often, for about 15 minutes or until cabbage is tender.
  3.  Raise heat to medium, uncover and let juices reduce to about half (be careful not to let burn).
  4. Taste and adjust seasoning, serve hot.

Jan 6, 2011

I love Black Eye Pea, and this recipe a Paula Deen Recipe is excellent! It's full of flavor unlike a lot of Black Eyed Pea Recipes. You can't go wrong with this one!! It's kicked up!


Ingredients

  • 4 slices bacon
  • 1 medium onion, chopped
  • 1 (16-ounce) package dried black-eyed peas, washed
  • 1 (12-ounce) can diced tomatoes and green chiles
  • 1 teaspoon salt
  • 1 teaspoon chili powder
  • 1/2 teaspoon freshly ground black pepper
  • 3 cups water 
Directions

  1. In a large saucepan, cook the bacon until crisp. Remove the bacon, crumble, and set aside to use as a topping for the peas. 
  2. Saute the onion in the bacon drippings until tender. Add the peas, diced tomatoes and green chiles, salt, chili powder, pepper and water. 
  3. Cover and cook over medium heat for 45 minutes to 1 hour, or until the peas are tender. 
  4. Add additional water, if necessary. 
  5. Serve garnished with crumbled bacon. 


Jan 5, 2011


If you don’t like cabbage this is a great way to eat it. Not only is it super easy, practically fail proof the flavor is really great. Simple, and excellent what more do you need? I am not much of a cabbage person, but my husband is so I am always looking for ways to make it eatable for me. This recipe is one of my favorites!

Ingredients:
  • 8 oz of bagged cabbage (coleslaw is what I use then you get carrots too)
  • 4 ounces of bacon
  • Salt (if desired)
  • 1 onion
Directions:
  1. Thinly slice 4 ounces of bacon. It's easy to slice when it's partially frozen, and on a medium high heat begin to pan fry the bacon.
  2. When the bacon is cooked through, but not crispy add thinly sliced onion once the onion is cooked add 8 ounces of bagged cabbage. Mix all together
  3. Cooked until cabbage becomes limp.
  4. Add salt as needed
Print Friendly and PDF
Check Out Our Online Recipe Book: www.CafeChatterbox.com
Blue Star Applicances and Ranges

Enter your email address:

Delivered by FeedBurner

Popular Posts

Blog Archive


