Aug 30, 2012


I have so much trouble finding low calorie on the go food to eat in the morning. I thought I was doing OK the other morning when I stopped for a breakfast sandwich and that night realized that the breakfast sandwich I had chosen was over 400 calories. OMG! I was so upset.

I set out to make sure we were not going to be eating breakfast that was too high in calories his semester. We have to eat, but it was going to be as low of calories as possible but filling at the same time. 

I came up with the idea to make my own breakfast sandwich on a bagel-thin but I wanted my egg to fit just right on the bagel. I didn't want to have to cut it down or have it a lumpy mess because most of the time I will be eating on my way to school. I don't want it falling all over the place or getting on my clothes. I found this cute little pan at Wal-Mart for under $5 that makes fried egg the perfect size. The only problem I found with this pan is although it looks non-stick it's not! You have to spray it with oil.


I put a lot of thought into what we could have and I came up with the Ham-let. A sort-of ham omelet just using lower calorie ingredients. It’s quick and easy to make the night before you need it and it tastes great the next day and it's fewer than 200 calories! Oh yea!!

Ingredients:
  • 1 Bagel thin- 110 calories
  • 3 egg whites (3 tbsp.) -25 calories
  • 1 tbsp. Hormel bacon bits -25 calories
  • 2 slices of Land O’ Frost Black Forest Ham -30 calories
Total = 190 calorie breakfast sandwich

Directions:

  1. Mix together egg whites and bacon bits add salt and pepper if you would like. 
  2. Spray (if necessary) pan with cooking oil (make sure it’s zero calories) cook egg and bacon. 
  3. Top bagel thin with ham, bacon and egg whites.  Allow to cool then add to a zip bag and refrigerate. Reheat in the microwave 30 seconds to 1 minute depending on your microwave.
  4. Wa-lah! Breakfast is served! 
Add an 80 calorie light and fit Yogurt for a total of 270 for breakfast which is less than most fast food breakfast sandwiches or frozen breakfast sandwiches for more food and a lot less cost. The average price of a pre-made sandwich is $1 this was half that price if not less! 

Check Out Our Online Recipe Book: www.CafeChatterbox.com

Aug 29, 2012


I have fallen head over heels in love with the Dannon Light and Fit Pina Colada Yogurt. It’s only 80 calories and the taste is incredibly amazing. If you stick it in the freezer for just a few minutes you it’s an 80 calorie dessert. Divine!

Check Out Our Online Recipe Book: www.CafeChatterbox.com

Aug 24, 2012


If you like quiche and you like jalapeno poppers you will love this pie. It’s a great combination of the two. I whipped this up a few nights ago for a quick and easy dinner. In the morning I took the pie crust and the cream cheese out of the freezer and let it warm up throughout the day. I threw it all together in the mixer and it was all done in under an hour.

Quick, and easy and great for any quiche lover!! I will say it doesn't taste as much like a jalapeno popper as I was hoping for nor was it as spicy as I was hoping for that that varies based on the jalapeno. 

The next time I make this recipe I plan on adding more jalapeno and maybe some cheese the cream cheese to give it more of a popper flavor. I love jalapeno popper dip! I think you could go along more with the dip just adding eggs and get more of the popper flavor. Give it a try and tinker with the recipe yourself! I bet you can create something amazing!

Ingredients:
  • 1 (9 inch) pie shell, pre-baked
  • 1/2 cup cream cheese, room temperature
  • 2 jalapenos, diced (seed them is you prefer less heat)
  • 1/2 cup milk
  • 1/2 cup cream
  • 5 large eggs, lightly beaten
  • 1/2 teaspoon smoked paprika
  • 1/8 teaspoon salt
  • 1 jalapeno, sliced
  • 1/2 cup cheddar cheese, grated

Directions:
  1. Spread the cream cheese over the bottom of the pie crust and sprinkle on the diced jalapenos.
  2. Heat the milk and cream over medium heat until just before it boils, about 5 minutes and pour it into a large bowl.
  3. Pour the eggs into the heated cream while stirring constantly.
  4. Mix in the paprika and salt.
  5. Pour the mixture into the pie plate and bake in a preheated 350F oven for 30 minutes.
  6. Remove from oven, arrange the jalapeno slices on top, sprinkle with cheese and bake until the cheese has melted and turned golden brown, about 15 minutes.
Original Recipe Source


Check Out Our Online Recipe Book: 
www.CafeChatterbox.com

Aug 22, 2012


My husband and I have decided to donate 1 pound of food for every pound we lose to a food pantry here in Houston. So far here is what we are up too! 40.4 pounds of food!!

Check Out Our Online Recipe Book: www.CafeChatterbox.com

Aug 16, 2012


Last night after dinner I decided I wanted to do something creative while I cleaned the kitchen up. I have no idea where the drive came from, but when it happens you have to run with it. I was looking for something simple and quick that wouldn’t leave me in the kitchen longer than it was going to take for me to clean dinner up.

I decided to make a recipe I have wanted to try for a while… chocolate fudge syrup! I had everything I needed on hand so I decided to give it a try.  It’s a super simple recipe that packs a delectable punch! Everything I read online said that once you made this recipe you would never buy chocolate sauce/syrup in the store again. Now I know why!

Immediately my husband vacated his man cave to see what I was doing because the housed smell so good. The fudge syrup was actually done before the kitchen that’s how fast this process is. It was so hard for us to wait for it to be cool enough to try. The smell is so intoxicating! Now I know what it feels like to work in the Hershey chocolate factory!

When we finally got to try a spoonful we were all in heaven. This is the nectar of the God’s!  I can’t wait to try it in milk, on ice cream or even over a little pound cake! Yummy! Btw the tip of my tongue is burnt… nope I couldn’t wait any longer! Patience is not in my nature!  Just a warning…

This would make a great holiday gift. You could make a basket up of ice sundae cups, bananas, a can of pineapple, whip topping, sprinkles, ice cream cones, a can of nut and a few other things for an ice cream party items. Put it all in a nice basket with a big jar of this chocolate fudge syrup. I don't know anyone who wouldn't love that!!  


Ingredients:
  • 1 cup water (I used purified) 
  • ½ cup cocoa powder
  • 2 cups sugar
  • ⅛ teaspoon salt
  • ¼ teaspoon vanilla

Directions:
  1. In your favorite pot add water and cocoa powder (I used Tollhouse). Heat on medium high and stir until cocoa dissolves. This doesn’t take but a minute or two.
  2. Add sugar and stir until it dissolves, then reduce your heat to medium. Continue stirring or whisking (My choice). Your chocolate will begin to boil. Once it gets to a nice roiling boil let it boil for 3 minutes. Be sure to continue to stir the entire time so that it does not boil over. This process happens very quickly.
  3. After the 3 minutes are up add the salt and vanilla
  4. Allow to cool. (This will be extremely hot!)
  5. Be sure to refrigerate once it’s cool
Original Recipe Source


Number of Servings: 24 (2tbsp per serving)
Nutritional Information:
  • 65 calories per serving
  • 17 carbs 
  • 0 grams of fat 
  • 0 protein
  • 16 sugar
*Nutritional information found on www.myfitnesspal.com this information will vary based on the products you use.*


Check Out Our Online Recipe Book: www.CafeChatterbox.com

Aug 14, 2012


The directions for this recipe certainly can’t get any easier. Place in a blender and blend. We were looking for a quick and easy salad dressing to have on our salads last night. I have gotten a little tired of the same old stuff so I decided to add a few ingredients together and see what I came up with. This dressing turned out great! It has a nice tangy flavor and it has bacon what more could you want?

Ingredients:
  • ½ Cup fat free Italian dressing (I used Kraft Zesty Fat Free)
  • 2 tbsp. low fat mayonnaise (I used Dukes Light)
  • 2 tbsp. bacon bits (I used Hormel)

Directions:
  1. Simple and Easy Add above ingredients to the blender
  2. Blend to a smooth consistency
  3. Serve at room temperature. 


Number of Servings: 6 (2 tbsp. per serving)

Nutritional Information:
  • 35 calories per serving
  • 2 carbs 
  • 2 grams of fat 
  • 1 protein
  • 1 sugar
*Nutritional information found on www.myfitnesspal.com this information will vary based on the products you use.*


Check Out Our Online Recipe Book: www.CafeChatterbox.com

Aug 8, 2012


A few weeks ago I stumbled across a blog called Why Not Sew?  Erin had a recipe listed for making your own laundry detergent. I was really excited to see her recipe because it was for a small amount only 2 gallons of homemade detergent. Most blogs have you making 5 gallons. I only had enough bottles saved to make 3-4 gallons.  I was able to take her recipe for 2 gallons and turn it into 3 as recommended by Jill from One Good Thing By Jillee.

I can’t tell you how excited I was to give this recipe a try. The reviews were so good and the money you save is so incredible that I knew making the small initial investment could be well worth it.

What made me initially take notice of this recipe was my last shopping trip for laundry detergent. I was almost out so I decided to get another bottle at Wal-Mart. A large bottle of Tide was coming in at almost $18 a bottle at our local grocery store that same bottle was almost $21. WOWOWOWOW that is crazy!! I can go through that bottle in about two weeks.  I know when you see cents you think well that’s not too bad, but it is when you think about how many loads you may do a week or even in a month. I can normally wash 15 loads a week sometimes as many as 20. Add the fabric softener, and any stain fighters to that it can become hefty in a years’ time. I was paying over $500 a year in detergent alone!! With this recipe I would be looking at $35.00 a year for the detergent.

So how does it work?? It was fantastic! Actually I think it works better than the laundry detergent I was using before. My clothes not only smell better but they look cleaner in general. One thing I was noticing before I made this homemade detergent was our towels never really smelled that great. They didn’t smell bad, but they didn’t smell as clean as I would have liked them to be considering you are rubbing them on your clean wet body after a shower. After using the homemade detergent the towels smelled so fresh even my husband said they smelled good. Humm looks like we made the correct decision to switch.

I made a mistake by using a bar of Zote verses a bar of bath soap and ended up with a huge disaster on my hands instead of 3-5 gallons of detergent I ended up with 10 gallons of detergent. I had to run to the hardware store and buy a 5 gallon buckets to make it all work. Unbenounced to me I was actually making the Duggar Family Recipe you know the family with something like 19 kids! HOLY COW! So with that being said I  think I will have enough laundry detergent for almost 1 year costing me about .02 cent per gallon! 

I didn’t add step by step pictures as I made the detergent because I was in a bit of a hurry at my last minute decision to make the detergent at midnight, but I will capture them next time. In the mean time you can see EXCELLENT step by step picture directions by Why Not Sew? CLICK HERE TO SEE THE PIC's

Ingredients:
  • 1 bar of bath soap ( like Dove or Ivory) If you are looking for a larger quantity visit the Duggar Family (This is the one I ended up using)
  • 1 cup of Borax
  • 1 cup of Arm & Hammer Super Washing Soda (Not baking soda)
  • 3-1 gallon jugs
  • Large Stew or Gumbo pot
  • 1 cheese grater
  • 1 large spoon
  • 1 funnel
  • Essential Oils (Optional)
Directions: (Click here for picture steps by Erin)
  1. Grate the soap with a cheese grater, then add to a large pot.
  2. To the pot add one gallon of water
  3. Cook until the grated soap melts down and stir well
  4. Add the Borax, and Super Washing Soda, then bring to a bowl continue to stir.
  5. You will notice the detergent coagulating right away
  6. Add additional 2 gallons of cold water to the pot and stir well. 
  7. Divide the detergent between three 1 gallon jugs
  8. *optional* Add 10 drops of essential oils to each gallon, close then gently shake the bottle to mix


Check Out Our Online Recipe Book: www.CafeChatterbox.com

Aug 7, 2012


After perusing the Southern Plate I came across a recipe that caught my eye. I ended up bookmarking it for future use. A few days ago I decided I was going to make it but I forgot to put it in the crockpot and I forgot to pull the chicken breast out of the freezer. Needless to say I wasn’t going to make it…

At the last minute I decided to make an adapted version with the things I had on hand. Instead of making it in the crock pot I made it on the stove top. In the end I realized my recipe wasn’t even close to the Southern Plate’s but it did turn out fantastic. She was certainly my inspiration. This is just incredible!! It’s so easy to make and the flavor is fantastic. I am using the leftover to make enchiladas with!

I highly recommend this recipe for a quick easy inexpensive week night meal. I literally made the entire meal in 30 minutes.


Ingredients:
  • 1-13oz can of chicken drained
  • 1 large onion, chopped
  • 1 -8 ounce box  Zatarain's Yellow Rice Mix,
  • ½ cup cheddar cheese grated
  • 1- 10.5 ounce can cream of poblano soup
  • 1-15 ounce can whole kernel corn, drained

Directions:
  1. In a large pot sauté onion until its tender, remove from pot and set aside. 
  2. In the same pot cook yellow rice according to package directions. 
  3. Once the rice is cooked about 20-25 minutes add onions back into the pot, add drained chicken, cheddar cheese, cream of poblano, and drained corn. 
  4. Mix well and heat all the way through. Once everything is heated through serve immediately.
Adapted from Original Recipe Source


Check Out Our Online Recipe Book: www.CafeChatterbox.com

Aug 4, 2012


I always have my eyes open for new and inventive low calorie ways of reinventing the wheel. Meaning how can I serve the same old salad (or whatever) and make it more exciting.  The last thing I want to happen in my low calorie eating is to get bored. Boredom can lead to failure!

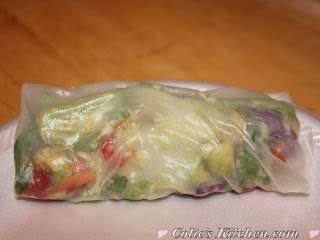
A few days ago I was in our international grocery store in the Asian section and came across rice paper. I love Vietnamese spring rolls which are made with rice paper. I got to thinking maybe you could do other things with rice paper too? Rice paper averages about 56 calories a sheet so what the heck I thought let’s give it a try!

My first venture so far into the rice paper trial has been making salad wraps. Make up about 6 cups of salad with all of your favorite salad ingredients including the dressing. Wet your rice paper, and then roll about one cup of salad up in the rice paper making rice paper salad wraps.

The rice paper will stick together sealing the edges. This makes a very fun salad side dish that is also an easy finger food. If you want to leave the dressing off of the salad you can serve it on the side as a dipping sauce. People love to dip! ;-)
Rice paper is a fun way to reinvent the same old eating routine and do it in a low calorie way!! As you can see in the picture above my first attempt at wrapping the salad resulted in it being wrapped too loosely. By the time I was finishing my 6th salad wrap they were turning out perfect! Practice makes perfect, or at least close!

Rice paper ideas:
  1. Ham and cheese salad
  2. Julienned Apples slices with light/sugar free caramel sauce
  3. Mixed fruit salad in fat free whip cream
Print Friendly and PDF
Check Out Our Online Recipe Book: www.CafeChatterbox.com

Aug 3, 2012


I was really excited to try this recipe it looked so good in the picture and seemed easy enough that I new I had to give it a try. I changed the meat up based on what I had on hand. Basically you can use any lunch meat you have I actually used deli chicken verse turkey and I used pepperoni verses the hard salami. 

We all really enjoyed this recipe. It's very interesting! I think the roasted peppers made it so good. Without the peppers it would have been just OK, but the peppers gave it a very unique and pleasantly surprising pazazz! It was super easy and most things I had on hand to make it work for us. It it a great recipe for a week night meal.

Serves: 6
Ingredients: 
  • 1 (8-ounce) container refrigerated crescent rolls (I used reduced fat)
  • 8 slices (1/2 pound) deli turkey (I used deli chicken)
  • 8 slices (1/2 pound) deli ham
  • 12 slices (1/2 pound) deli hard salami (I used pepperoni)
  • 8 slices (1/2 pound) Swiss cheese (I used mozzarella)
  • 1 (12-ounce) jar roasted peppers, drained (I only used 1 whole pepper)
  • 4 eggs, beaten (I used 6 egg whites)

Instructions: 
  1. Preheat oven to 350 degrees F. Unroll crescent roll dough without separating triangles. Separate dough into 2 squares along center cut line.
  2. Place 1 square of dough into an 8-inch square baking dish; using your fingertips, press dough to fit bottom of dish.
  3. Layer with half of each of turkey, ham, salami, Swiss cheese, and roasted peppers. Pour half of beaten eggs over peppers and repeat with remaining meat, cheese, and peppers.
  4. Place remaining square of dough over peppers. Pour remaining beaten eggs over dough and cover lightly with foil. 
  5. Bake 20 minutes, remove foil, and bake an additional 20 to 22 minutes, or until golden and heated through. Let cool 15 to 20 minutes then cut and serve. 


Check Out Our Online Recipe Book: www.CafeChatterbox.com

Blue Star Applicances and Ranges

Enter your email address:

Delivered by FeedBurner

Popular Posts

Blog Archive