Jan 31, 2013


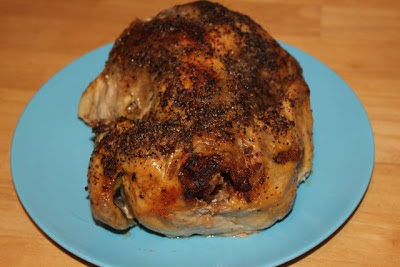
After Christmas I found a great deal on turkey’s … .10 cents per pound. I got a 20 pound turkey for $2. I knew I couldn’t pass up that deal. I decided to look for a new turkey roasting recipe when I came upon this one.

I must admit this was the best turkey we had ever had. I think the key is to start cooking the turkey with broth already in the roaster. It really helped to steam the turkey. Not only was it full of flavor but it was almost incredibly moist. I don’t think I have ever eaten a turkey so moist.

I will be honest you when I say I am not a big turkey fan, but this turkey was exceptional! I have never had one better!


Ingredients:
  •  1 (18-20 pound) whole turkey
  •  1/2 cup unsalted butter, softened
  •  Salt and freshly ground black pepper to taste
  •  1 1/2 quarts turkey or chicken stock 

Directions:
  1. Preheat oven to 325 degrees F (165 degrees C). Place rack in the lowest position of the oven.
  2. Remove the turkey neck and giblets, rinse the turkey, and pat dry with paper towels. Place the turkey, breast side up, on a rack in the roasting pan. Rub the skin with the softened butter, and season with salt and pepper. Position an aluminum foil tent over the turkey.
  3. Place turkey in the oven, and pour 2 cups turkey or chicken stock into the bottom of the roasting pan. Baste all over every 30 minutes with the juices on the bottom of the pan. Whenever the drippings evaporate, add stock to moisten them, about 1 to 2 cups at a time. Remove aluminum foil after 2 1/2 hours. Roast until a meat thermometer inserted in the meaty part of the thigh reads 180 degrees F (80 degrees C), about 4 hours.
  4. Transfer the turkey to a large serving platter, and let it stand for at least 20 to 30 minutes before carving.
Original Recipe Source


Check Out Our Online Recipe Book: www.CafeChatterbox.com

Jan 30, 2013


As you can see from the picture above we were having a major freezer crises! I can’t tell you how many times I have gotten so angry dealing with this freezer that I have thrown everything across the kitchen then just sat down on the floor and cried... yes it was that bad. 

My poor husband would come into the kitchen and scoop me up and pick up my pieces and my mess! As  you can see below we didn't have an extra inch to spare. I always had to pass up great freezer deals at the store because we were simply out of room.


After my last freezer meltdown he suggested we get a large standalone freezer. I couldn’t help but get excited about this idea!! I big freezer and not having to deal with this freezer! Wahoo let’s get shopping!!


After an afternoon of looking around we found our new freezer and the next day it was delivered. I was thrilled… look how big it is! It was the biggest freezer I could find.  Finally no more fighting the freezer!! Haha little freezer take that!

I moved everything over from my little freezer to the big one and look how much room I have. Let’s fill it up!! 


Now look at this nice empty little freezer that will only be used to hold ice. By the way the little freezer now has three full bags of ice in it... I love that! It's been great being able to buy extra freezer items and not have to worry if they are going to fit or not! 


... happiness is an empty and full freezer.


Check Out Our Online Recipe Book: www.CafeChatterbox.com

Jan 29, 2013


Over the last year I have been buying a lot of canned chicken from Sam’s Club. I buy the Members Mark brand which comes in a 5 pack. Each can is 13oz for a total price of $9.98 (We don’t pay sales tax on food in Texas).

A few days ago our grocery store HEB had whole fryer chickens on sale for .67cent per pound. I decided to buy one and do an experience to see if it’s cheaper to buy a whole chicken, cook it myself, remove it from the bones, and separate it into 2 cup servings, then freeze or was it cheaper to stick to the cans and not worry about all the work? 

Don't get me wrong I knew it was pretty obvious what the outcome would be, but I wanted to know the numbers. We had friends over for dinner and a whole chicken was left over so I thought what the heck! Let's see what we can find out!!


The chicken I purchased was 5lbs. for a total of $3.35. which is .67 per pound. After I cooked the chicken it weighed exactly 4lbs bringing the total cost up to about .84 cents per pound. After I removed all the skin and bones the chicken meat weighed 2.1 pounds bringing the total up to $1.59/lb. OUCH in that case you are almost better off buying boneless chicken breast and forgetting about the hassle of de-boning the chicken. I can normally get boneless chicken breast between $1.50-$1.99/lb.
  • Sam’s club is 5 cans for a total of 65 ounces for $9.98 
  • Homemade deboned fryer is 33 ounces for $3.35
  • Sam’s club is .15cents per ounces
  • Homemade is .10 cents per ounces
The difference between buying canned verses homemade is a .05 cents savings per ounce when you go homemade. OK so .05 cents doesn’t seem like much but when you consider 1 pound is 16 ounces 16x.05 cents = a savings of .80 per pound.

Almost $1 a pound … I will take a little extra work on a Sunday afternoon to save some money. I over paid on my 5 cans of chicken buy $3.25 OUCH!

I can also see buying the boneless chicken breast when they are on sale and saving myself a ton of time and work!

*BONUS*
If you make your own chicken broth you have the leftovers to bring down the cost of your chicken. You can’t beat a freebie mixed into that equation!

Check Out Our Online Recipe Book: www.CafeChatterbox.com

Jan 26, 2013


We were having some guests over a couple of nights ago and I wanted to serve them something that wouldn’t be too time consuming to make, because I was going to be short on time, and it had to be something I already had on hand because I didn’t have time to run to the grocery store and it had to go a long way and feed everyone. Ugh! That’s a test!

I remembered I had two whole chickens in the freezer and thought I could figure out something to do with them. I am never a fan of roasted chicken because they never turn out as flavorful as I would like them to be. I started looking around the web and came across this recipe and thought it was perfect. 

It was definitely perfect! It honestly could not have turned out any more perfect. This chicken was fantastic! The flavor was amazing and the house smelled divine while it was cooking. I couldn’t believe how moist it was! I couldn’t have asked for a better presentation. My guest raved about it which made me very proud. This is a must try if you have an extra chicken in need of a cooking!


Ingredients:
  • One 5 lb. chicken
  • Kosher salt
  • Freshly ground black pepper
  • 3 small handfuls of fresh herbs (basil, parsley, thyme, marjoram or oregano), finely chopped
  • 1/4 cup olive oil
  • 1 lemon, halved
  • 4 bay leaves
  • 1 sprig of fresh rosemary
  • 1 oranges quartered

Directions:
  1. Preheat oven and a roasting pan to 400°F. Rinse the chicken and chicken cavity with water and pat dry with paper towels.
  2. Rub salt over the inside of the cavity. Grasp the skin at the tip of the chicken breast and gently pull up. Use your fingers to gently separate the skin from the breast meat, taking care not to tear the skin. Sprinkle a little salt into the gaps and insert as much of the chopped herb mixture as you can. Drizzle with a little olive oil. Stuff the cavity with the lemon, bay leaves, rosemary, and any remaining herbs and the quartered orange. Pull the skin of the chicken breast over the breast so that none of the meat is exposed. Tuck in the wings and truss with kitchen string.
  3. Rub some olive oil over the chicken and sprinkle all over with salt and pepper. 
  4. Carefully remove the hot roasting pan from the oven and add a little oil to the bottom of the pan. 
  5. Place the chicken on one side, breast side down, on the roasting pan and put it back in the oven. Cook for 5 minutes, then turn the chicken so that the other breast is on the pan and cook for another 5 minutes. Starting off by cooking the chicken this way will help brown the breasts. Then turn the chicken over so that it is back-side down. Cook for 1 hour, or until the juices run clear (not pink) when a knife tip is inserted into both the chicken breast and thigh, about 165-170°F for the breast and 175-180°F for the thigh.
Original Recipe Source


Check Out Our Online Recipe Book: www.CafeChatterbox.com

Jan 22, 2013


Taken with my Smartphone... Not the best Pic!

My husband and I came home from long day of looking for a freezer. Neither one of us were in the mood for anything from a drive through nor we both felt too tired to deal with going to a restaurant. We were both craving Italian food, but without having to go out.

I remember that I had a bag of frozen tortellini in the freezer awaiting our arrival, but no sauce. I decided to make a simple cheddar cheese sauce then kick it up with a few spices. The tortellini turned out fantastic. It made me realize once again that there is no need to buy things in jar and cans when something quick, easy and homemade taste so much better! This sauce would be great on just about anything... like steamed veggies.

Ingredients:
  • 2 pounds of dry or frozen tortellini (cooked according to the packaging)
  • 2 cups milk
  • 1 cup cheddar cheese
  • ¼ cup butter
  • ¼ cup flour
  • ½ teaspoon salt
  • 1/8 teaspoon paprika
  • 1/8 teaspoon pepper
  • 1/8 teaspoon garlic powder
  • 1/8 teaspoon of onion powder
  • ½ teaspoon dried parsley


Directions:
*Note: I find when making a cheese sauce that having everything measured out and ready to add to your pot immediately is the key to making sure this turns out correctly. You need to have everything ready to go when you need it. You won’t necessarily having time to start measuring or you might end up with more lumps in your cheese sauce than sauce.*
  1. Place your burner on medium and begin to melt the butter in saucepan, and gradually start adding flour using a whisk to mix everything together. Be patient and go slow with this process.
  2. When your flour butter combination starts getting thick slowly start adding milk and whisking at the same time. Stay patient! If it starts lumping up don’t panic just keep whisking it should start coming together. Go slowly while adding the milk
  3. As it starts to thicken up keep whisking and add the spices while doing so. DO NOT allow your cheese sauce to come to a boil at any point because once you add your cheese the oils in the cheese and the milk will start separating you don’t want that or the recipe will be ruined.
  4. Stir in the cheddar cheese and continue mixing with the whisk. Heat until cheese melts and sauce the sauce becomes a smooth consistency. **if you find your cheese sauce to be lumpy you can slowly pour it into a blender and run it for a few seconds. This will remove all of your lumps. If you don’t have a glass blender you will need your cheese sauce to cool a bit before pouring it in the plastic blender.**
  5. Add tortellini to the cheese sauce and heat through.


Check Out Our Online Recipe Book: www.CafeChatterbox.com

Jan 16, 2013


I made the biggest bone head move while making dinner a few nights ago.  I was already late cooking dinner so I was trying to get dinner done as soon as possible. I suppose that was mistake number one. Here is where mistake number two comes in. I peeled 5lbs. of potatoes and put all the peels in the sink, ran water, and turned on the garbage disposal… BIG mistake!

I looked down in the sink and all the ground up potato peels and water were swirling around and around but not going down. OH NO! You have got to be kidding me not this week!! I knew I didn’t have time to wait around for a repair man and I needed to get dinner done but it wasn’t happening with this sink disaster. I got the plunger and went to work on the sink… nothing. I started the dishwasher hoping it would push through… nothing. I plugged up one sink and plunged the other at the same time… nothing. Then I had a meltdown…

I had my laptop sitting on the kitchen cabinet so I went in search of a fix for this problem. I have used Draino more times that I care to share, but it NEVER works I mean never! I hate spending all of that money for something that doesn’t work and stinks up the kitchen. Plus you have to let it sit forever and I am sure it’s terrible for the environment.

I can across an article that mentioned using baking soda and vinegar to unclog a clogged sink. At this point I was willing to try just about anything although I KNEW it wouldn’t work.


The instructions were pretty simple.
  1. Remove as much water out of the sink as possible
  2. Heat 1 cup of vinegar in the microwave for 1 minute
  3. Pour 1 cup of baking soda into the clogged hole
  4. Add vinegar to the clogged hole and watch it bubble up (OK the bubble up is kind of cool) Make sure all the baking soda has gone down the hole.
  5. Then walk away and (My instructions here) take a deep breath. Maybe scream into a pillow, or have a drink whatever you need to do.
  6. Wait 5-1o minutes before turning on the garbage disposable

5-10 minutes later I went to check out what I hoped would be the miracle I needed. I certainly needed one at that moment. Both sides of my sink were full (almost to the top) with water. Wow where did all of this extra water come from? Remember I drained the sink first?

I held my breath and turned on the garbage disposal. Suddenly everything went down. It was a miracle!! In 10 minutes I saved over $100.00 and a ton of time. I didn’t need a repairman … heck I didn’t even need my husband for this one, but was sure proud of my accomplishment! I was pretty proud of myself too.

I had exactly 1 cup of vinegar and 1 cup of baking soda left to use for this miracle. Right after dinner that night I ran to the grocery store to stock up on baking soda and vinegar. I think we are set for awhile.


I looked at so many articles I don't even know who to thank. Whoever you are out there thank you for saving me a ton of time and money!!

It worked for me! I hope it works for you too!! 


Check Out Our Online Recipe Book: www.CafeChatterbox.com

Jan 15, 2013


We loved this recipe! The corn in the enchiladas adds such a nice change to your “typical” enchilada recipe. One thing I will say is you are not expecting the corn yet the sweetness from the corn paired with the spiciness from the enchilada sauce is a nice combination.

I have been dying to try this recipe for a long time, but for some reason I kept forgetting to make it. I am so happy I did and I can’t wait to make it again. It’s probably my new favorite enchilada recipe. It’s going to be hard for any other recipe to top this one. Delicious!
Directions:
  • (8) 6-inch corn tortillas
  • 1 tablespoon vegetable oil
  • 5 scallions, white and light green parts, chopped
  • 2 garlic cloves, finely chopped
  • 1 1/2 cups fresh corn kernels (from 2 medium ears) $
  • 1/2 cup whole milk
  • Salt (Just a few dashes or leave it out)
  • 2 cups grated pepper Jack or cheddar (I used cheddar)
  • 1 10-oz. can enchilada sauce (I used Homemade Enchilada Sauce)
Directions:
  1. Preheat oven to 350°F. Stack tortillas, wrap in foil and bake until softened, 8 to 10 minutes.
  2. While tortillas are baking, oil a 7-by-11-inch glass baking dish. Warm 1 Tbsp. oil in large skillet over medium-high heat. Add scallions and garlic, and cook until fragrant, about 1 minute. Stir in corn and milk and cook, stirring occasionally, until thickened, 7 to 10 minutes. Season with salt.
  3. Remove tortillas from foil. Set aside 1/2 cup cheese. Spoon a heaping tablespoon of corn mixture in center of a tortilla. Sprinkle with a heaping tablespoon of cheese. Roll up tortilla and set in dish, seam side down. Repeat with remaining tortillas, overlapping them slightly. Pour enchilada sauce over tortillas and sprinkle with reserved 1/2 cup cheese. Bake until bubbling, about 20 minutes.
Original Recipe Source

Check Out Our Online Recipe Book: www.CafeChatterbox.com

Jan 12, 2013


A year or so ago my friend Krista gave me a great idea that she lives by. I thought it was such a great idea that I am going to give it a try this year. She calls it her Christmas Gift Card Savings Plan.

Every payday she buys a gift card that does not have an expiration date like for instance a Wal-Mart Gift Card. She stores her gift cards in one place and then stores a sheet of the gift card numbers in a different place just in case something happens to them.

She knows her daughter Casey loves Macy’s so she will go buy a $25 gift card there one pay day, and the next pay day she might get one at Sephora. Nope none of them expire.
Krista buys a lot of stuff at Wal-Mart during the holidays, in truth I think she does the majority of her shopping there, so she always make sure she purchases the majority of her gift cards from Wal-Mart.

She also knows that her Dad always wants a gift card for a sporting goods store, her mom a hobby store, her sister and brother in law love to eat out, that’s another gift card, her kids love iTunes, and Amazon, and her Mom loves anything from Bath and Body works.

When Krista walks into Bath and Body Works right before Christmas she can pick her Mom up some sweet deals and pay for it all on the gift cards she may have bought in June! The great thing is she stays within her budget, and the money has already been set aside for her Mom’s gift.

By the time Christmas Rolls Around in 2013 Krista will have 25 Gift Card because she doesn’t buy any in December. At $25 each that’s a grand total of $625 dollars.
WOW that’s a lot of money you don’t have to worry about at the last minute. She is so smart that she even buys two gift cards from Home Depot throughout the year because she knows they are going to buy their Christmas tree there. No cash needed she just whips out her Home Depot Gift Card! 


Okay so you know the critics are going to have something to say about this…

“Why not just put the money in the bank and draw interest on it?”  

Although I would agree with you … you could put it in the bank, but how many people are so disciplined? If you are GREAT! That is wonderful, but if you know yourself better than that you could always try the Christmas Gift Card Savings Plan. You are not going to be losing much in interest anyway!

Just remember to do your homework and only buy Gift Cards that don’t expire. Do you think this is something you could do? I think the biggest problem I would have would be remembering to buy the gift cards each payday!

Thoughts?


Check Out Our Online Recipe Book: www.CafeChatterbox.com

Jan 10, 2013


My husband loves molasses cookies so this year for Christmas we decided instead of making both molasses cookies and gingerbread men we would make molasses men. We didn’t want to have all the extra cookies around the house. They actually turned out really cute and killed two birds with one stone. I really like this recipe because it has (to me) just the right amount of spices and they stay soft for a long time which I love.

I live in a very humid climate so it normally doesn’t take long for cookies to get hard. These cookies are still fantastic two weeks later. We really enjoyed this recipe!


Ingredients:
  • 1-1/2 cups butter, softened
  • 2 cups sugar
  • 2 eggs
  • 1/2 cup molasses
  • 4-1/2 cups all-purpose flour
  • 4 teaspoons ground ginger
  • 2 teaspoons baking soda
  • 1-1/2 teaspoons ground cinnamon
  • 1 teaspoon ground cloves
  • 1/4 teaspoon salt
  • 1/4 cup chopped pecans
  • 3/4 cup coarse sugar

Directions:
  1. In a large bowl, cream butter and sugar until light and fluffy. 
  2. Beat in eggs and molasses. 
  3. Combine the flour, ginger, baking soda, cinnamon, cloves and salt; gradually add to creamed mixture and mix well. 
  4. Fold in pecans.
  5. Shape into 2-in. balls and roll in coarse sugar. 
  6. Place 2-1/2-in. apart on ungreased baking sheets. Bake at 350° for 13-15 minutes or until tops are cracked. Remove to wire racks to cool. 

Yield: 2 dozen.


Check Out Our Online Recipe Book: www.CafeChatterbox.com


Jan 9, 2013


My husband grew up with a Scandinavian mother who always made rosettes for Christmas. He loves rosettes because of the wonderful memories that go with them. This is a really wonderful cookie that is light and delicate, and to be honest with you a real pain in the rear to make.

These cookies are so delicate that any wrong move while removing them from the rosette irons will cause them to break. If the batter is too thick the cookies don’t turn out, if you fry them too hot they don’t turn out, and if you live in a humid climate like I do they take forever to dry out enough to stay crispy and half the time they don’t stay crisp.

If you have the time and patience to make these I highly recommend doing so. They may even become a tradition in your home like they are in ours.

Ingredients:
  • 2 eggs
  •  1 tablespoon white sugar
  •  1 cup sifted all-purpose flour
  •  1 cup milk
  •  1 teaspoon vanilla extract
  •  1/4 teaspoon salt
  •  Vegetable oil for frying
  •  Sifted confectioners' sugar
Directions:
  1. Combine eggs, sugar and salt; beat well. Add remaining ingredients and beat until smooth.
  2. Heat a rosette iron in deep, hot oil (375 degrees) for 2 minutes.
  3. Drain excess oil from iron. Dip in batter to 1/4 inch from the top of the iron, then dip iron immediately into hot oil (375 degrees).
  4. Fry rosette until golden, about 30 seconds. Lift out; tip upside down to drain. With fork, push rosette off iron onto a rack placed over paper towels.
  5. Reheat iron 1 minute; make next rosette.
  6. Sprinkle rosettes with confectioners' sugar.
Original Recipe Source

Check Out Our Online Recipe Book: www.CafeChatterbox.com

Jan 8, 2013


You know losing weight could be easier than I thought considering I didn’t have time to eat much today. This is what happens when you are trying to accomplish a lot in a week because school starts back next week. The bad thing is life becomes a whirlwind again.

In some weird and psychotic way I am looking forward to school starting again. I don’t know why I guess because it’s just the norm for me now. Then I will feel like life is back to normal and we can move on from the holidays and vacation and so on…

Although this week is kind of a watch what you are eating low impact exercise week next week will be a much more productive week on the weight loss front. At school we have an incredible gym I will be utilizing as normal. Hey if you are paying for it you better use it right? I am looking forward to my workouts as usual. My new goal is to try yoga so that will be fun and interesting.

As I stated above I didn’t have a lot of time budgeted for eating today so it wasn’t a bad day in the food world. I missed breakfast, and had a potato for lunch. For dinner I had  sandwich and some potatoes. One thing I had way too much of was diet soda!

Why is it so hard to walk away from soda? In 2000 I stopped drinking the sugared up soda for good, but for some reason now I can’t walk away from diet soda. I am thinking about making a bit pitcher of ice tea to see if that will help me back off the soda. I can’t help but believe it will certainly help.

I hope everyone who has been emailing me about their journey this week is doing well too. Hit me up if you need help from jumping… into a cake or a pan of cookies!


Photo Credit
Although I think the Biggest Loser is a bit extreme when it comes to weight loss I always find it exciting to see how much weight each person loses. I also find it very exciting to see if they can keep the weight off. That is always the tough part isn't it?

If you need some weight loss inspiration check out these Biggest Loser weight loss pictures. They are mind blowing and extreme weight loss pictures from Biggest Loser contestants. 

Wouldn't be fun to lose all the weight without all the work hahahaha! I guess there would be no reward in that!

Check Out Our Online Recipe Book: www.CafeChatterbox.com


I have made these meatballs before …the recipe was called Tangy Asian Meatballs. I got a ton of emails asking me if I have ever made them with ground beef, it seems many people don’t care for ground pork. Other than it being inexpensive I have to agree with them. I am not a fan of pork for the most part. Bacon is pretty much it for me.

I decided to reinvent this recipe using ground beef in place of pork and I made this recipe on the stove top in place of the crock pot. Sometime I forget to put them in the crock pot.

The recipe actually turned out fantastic much better than the original recipe. I like the beef in place of the pork by far. It had a much better flavor, and I really liked making it on the stove top because it was quick … super quick! Best of all it was not as greasy because I used the ground beef this time.

I highly recommend giving this recipe a try… quick… easy and inexpensive! If you want to try the crock pot or pork version you can find the Tangy Asian Meatball recipe here.

Ingredients:
  • 1  pound  ground beef
  • 1/3  cup bread crumbs (use any flavor)
  • 3  scallions, white and light-green parts, chopped
  • 1  large egg
  • 1  tablespoon  soy sauce
  • 1  tsp.  ginger powder
  • 2  cloves garlic, finely chopped
  • 1/2  cup  barbecue sauce
  • 1/4  cup  jarred Chinese plum sauce 
  • 2  tablespoons  hoisin sauce
Preparation:
  1. Combine ground beef, bread crumbs, scallions, egg, soy sauce, ginger and garlic in a large bowl; mix gently but thoroughly with your fingers. 
  2. Roll into 1-inch balls.  Add meatballs to a large pot placed on medium.
  3. In a small bowl, whisk together barbecue sauce, plum sauce and hoisin sauce; pour over meatballs. Gently stir to coat.
  4. Once the meatballs are in the pot covered in sauce do not stir again for 30 minutes this will prevent the meatballs from breaking. After 30 minutes turn the meatballs. 
  5.  Cover and cook on medium until meatballs are cooked through around another 15 minutes. 
Check Out Our Online Recipe Book: www.CafeChatterbox.com

Jan 4, 2013


If you like orange slice candy you will probably love these cookies. These are a staple in our family for the holidays. I don’t particularly like them, but then again I don’t like orange slice candy. I will tell you that I am in the minority in our family because everyone else loves this recipe. 

It’s a very old fashioned recipe that was my Papa’s favorite cookie during the holidays. I don’t think it would have been Christmas in his heart without Orange slice candy cookies.

Ingredients:
  • 1 pound bag orange candy slices (jelly candy)
  • 2 cups flour
  • 4 eggs
  • 1 pound box brown sugar
  • 1-1/2 teaspoons vanilla
  • 1 oz. of whisky
  • ½ teaspoon salt
  • ¼ teaspoon baking soda
  • 2 cups chopped pecans
Directions:
  1. Cut orange slice candy into small pieces, coat with ¼ cup of the measured flour
  2. Beat eggs till lemon colored
  3. Gradually add sugar to the eggs, and continue beating as you are adding sugar.
  4. Add vanilla and whisky
  5. Stir in flour, salt, baking soda, pecans and candy
  6. Mix well
  7. Spread ½ inch thick into a 17x11x1 pan (Jelly Roll Pan)
  8. Bake at 275 degrees 20-30 minutes.
  9. Cut into bars while hot then roll into powdered sugar
  10. Cool then seal in an air tight container. 
Check Out Our Online Recipe Book: www.CafeChatterbox.com

Jan 3, 2013


I am not a fan of Peanut Butter fudge but my husband loves it and so does my Uncle Floyd. We thought it would be a fun addition to Uncle Floyd’s gift this year. It actually set nicely for once. Normally it’s too warm to set up well, but this year we got lucky and it turned out perfect. I highly advise that if you are going to make this recipe make sure that your kitchen isn’t piping hot or it will take forever to set.

This is a simple recipe to make and in truth you don’t even need a candy thermometer you just have to watch it and never walk away from it while it’s on the stove top. My best advice is to have every ready to go and premeasured and stir … stir … stir… You don’t want it to burn!

According to my husband this is delicious and extra creamy!!

Ingredients:
  • 3 cups sugar 
  • ¾ cup butter
  • 2/3 cup evaporated milk
  • 7oz. jar of marshmallow cream
  • 1 cup creamy peanut butter
  • 1 tablespoon vanilla extract
Directions:
  1. Spray a 13x9 inch pan with cooking spray and set aside
  2. Combine sugar, butter, and milk in a heavy 2-1/2 quart saucepan and place on a medium heat
  3. Bring to a full rolling boil (important) stirring constantly
  4. Continue boiling for an additional 5 minutes (no less) once it’s at a rolling boil
  5. To prevent scorching remove from the heat and stir in peanut butter (stir well) next add the marshmallow cream (stir in well). Then add the vanilla and beat until well blended.
  6. Pour into your pre-sprayed 13x9 pan cook to room temperature and cut into squares.

Makes approximately 3 pounds.


Out Our Online Recipe Book: www.CafeChatterbox.com

Jan 2, 2013


After too many mornings of my favorite Flintstones Alarm Clock waking me up it would eventually die on me. I loved this clock. I think it was the only reason I got to high school every morning. It had a relentless bell on it that wouldn’t seem to stop ringing. There were many mornings I wanted to throw it. The day it stopped working I was heartbroken.

Fast forward (a lot of years) …. Imagine my surprise when I opened up my Christmas gifts and there was my beloved Flintstones Alarm Clock. OK so it wasn’t my original alarm clock, but it was one my husband found online. I couldn’t have been happier! After all these years here it was again!

This was my favorite Christmas present for so many reasons. It proved that my husband actually listens sometimes when I tell stories. I know he went through a lot of trouble to make sure he got it for me. Best of all this is my favorite Christmas gift because it means I get to enjoy something I loved from my childhood all over again.

Happy Wordless Wednesday!


Check Out Our Online Recipe Book: www.CafeChatterbox.com

Blue Star Applicances and Ranges

Enter your email address:

Delivered by FeedBurner

Popular Posts

Blog Archive