Oct 24, 2010

I was not sure if I would like this recipe or not, but I really did. It definitely put a different spin on green beans, and it really brought out their natural flavor. I like food that has an earthy taste, and this truly fit the bill. Be sure to watch them when they are cooking because they can go from cooked to burnt very quickly. I got mine out of the oven just in time. Thank you Seamouse for this great recipe.
Ingredients:
  • 2 lbs green beans 
  • 1 -2 tablespoon olive oil 
  • 1 teaspoon 
  • 1/2 teaspoon fresh ground pepper
Directions:
  1. Preheat oven to 400°F.
  2. Wash, dry well, and trim green beans.
  3. Put green beans on a jelly roll pan.
  4. Drizzle with olive oil.
  5. Sprinkle with salt and pepper to taste
  6. Use your hands to be sure all the beans are evenly coated and spread them out into 1 layer.
  7. Roast for 20-25 minutes, turning after 15 minutes, until beans are fairly brown in spots and somewhat shriveled.
  8. Serve hot

Oct 23, 2010

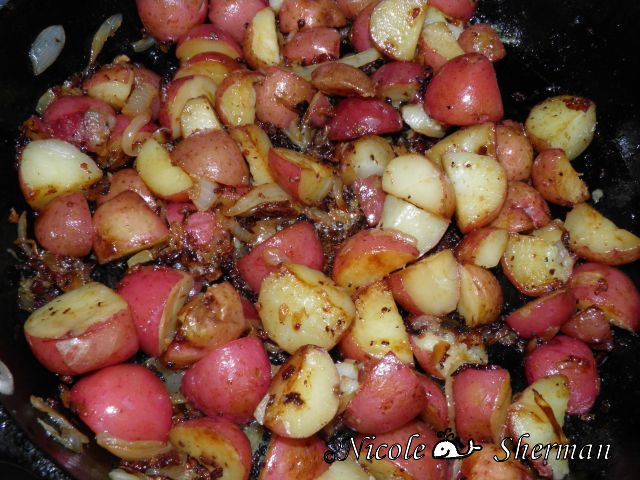
I love this recipe. My Dad would make it all the time when I was a kid, especially when we would go to our river house for the weekend. He would get up early and dig up some new potatoes out of the garden, and make this dish on the camp fire. He never wanted to heat up the house during the summer so he did most of the cooking outside.


Ingredients
  • 2lbs new potatoes (red potatoes)
  • 2 tbsp. margarine
  • 2 tbsp. olive oil
  • 1 medium onion diced
  • Salt/pepper
Directions
  1. Wash and quarter new potatoes, and dice onion
  2. In a cast iron skillet or any skillet melt margarine, and then add olive oil and heat.
  3. On a medium high heat add onions and new potatoes and stir together
  4. Pan Fry (stirring every few minutes) until potatoes are tender between 30-45 minutes depending on the size of your potatoes
  5. Add salt and pepper as needed serve hot

Oct 13, 2010


Top Ten Organizing Tips (From Betty Crocker)
  1. Group like items in the cupboard together and label the shelves (i.e. pasta & grains, soup, tea). This will provide you with a visual cue as to what you need to replenish.
  2. On the top cupboard shelf store dry foods that are specifically for guests that pop by. Items like assorted crackers, jarred spreads, anchovies and olives can be quickly assembled if you need to act quick.
  3. Contrary to popular belief, spices to have a shelf life. Once a year, toss any spices that have not retained their aroma.
  4. Transfer pastas, dry beans, rice and flour to clear air-tight containers and place a label on the container indicating when you purchased the item. Dry foods that have been kept too long start to lose their color and can form grain mites.
  5. After a shopping trip, place newer items at the back of the fridge. Older items moved up front will get used before they expire.
  6. To avoid science experiments from taking over your fridge, once a week throw out any items that just don't belong anymore, such as uneaten leftovers.
  7. Mimic your supermarket's storage system. If they don't have something refrigerated, do the same at home i.e. tomatoes and most fruits do not need to be refrigerated; most vegetables do.
  8. More than 1/4 inch frost build-up in a freezer increases the amount of energy uses. If necessary, defrost your freezer often.
  9. If storage containers take up too much space in your freezer, create an airtight seal using foil. Then apply a strip of colored tape to identify the contents i.e. red equals steak, blue equals fish. Note: Stickers do not work as well as tape in the freezer.
  10. No need to have three bags of peas - consolidate all like items.

Oct 12, 2010

(Picture from CNN)

Obviously, I did not take this picture, but considering I am posting this as the second miner is on the way to the top, I thought this picture was perfect for Wordless Wednesday!
What more can you say, but God is Good!


Recently I went from having a kitchen freezer and a full size large freezer to just having a kitchen freezer. Our large freezer died, and we do not want to purchase a new one until we move in the spring. Less to move! Wow what an adjustment. As you can see, my freezer is packed. We never have enough room now. I cannot stock up on many of the things I did stock up on. When I was cleaning out the large freezer, I can across things that looked like they had been there five years.


I am horrible about putting things in the freezer that later become unidentifiable. I do not know what they are much less, how long they have been there. Even when I have gone through the trouble of labeling, I am never sure if it is safe to eat. I could never have told you what it was. Is there a time limit when freezing food? I found this article on Yahoo Green to be very informative. How long can you freeze food?

Oct 8, 2010


Hi everyone!


I hope you are having a wonderful Friday! Kevin and I are about to head out for lunch, and a little shopping. So far, that’s the beginning of our weekend. It’s a beautiful day here in Houston so it’s time to get out and enjoy it.


Saturday I am heading to Wally World for a little grocery shopping, and since UT isn’t playing, I suppose I will get other things around the house accomplished.


Sunday will be the Texas on TV, homework, and to start working on at least one of my final projects. It’s so nice outside that it’s going to be hard to stay inside.


I hope you all have a wonderful weekend! Don’t forget to enter out Stubbs BBQ Kit Giveaway!!


Oct 6, 2010


You just never know what you will find in the pantry!

Oct 2, 2010

I had to share this article because it’s so me. I am the frugal gourmet. I save all our ketchup packets, soy sauce, you name it that we get when we purchase take-out. I can’t tell you the last time I purchased condiments. If a recipe calls for a ½ cup of ketchup I cut open ketchup packets and squeeze them in a measuring cup. I just don’t believe in wasting free items I already paid for. If McDonalds, King Wok, or Whataburger want to load me down with condiments I will be more than happy to take them. My way of looking at it is I already paid for them when I purchased my meal why pay for them again. The great part is they freeze well. I throw them in a gallon size freezer bag, and when I need them they are ready to go. If you need them defrosted quickly just drop them in a bowl of hot water, and you are ready to roll. Here is an article on other frugal weird-isms. Click Here
I love chicken fried chicken so when I saw this recipe I had to try it. I am happy I did. It turned out crispy, and very flavorful.

Ingredients:

  • 3 Chicken boneless Breast
  • 2 Eggs
  • 1/2 Cup Italian Seasoned Bread Crumbs
  • 1/2 Cup Flour
  • 3-4 Cups Cooking Oil
Directions:
  1. Pre heat cooking oil in skillet
  2. With a meat cleaver pound each chicken breast until it's thined out evenly
  3. Scramble eggs until they are fluffy
  4. Combine flour and italian seasoned bread crumbs and mix well
  5. Take each breast and dreadge through the egg mixture then through bread crumb mixture
  6. Each chicken breast will need to be cook by it'self unless you have an extra large skillet
  7. When the oil is ready add a battered chicken breast to the oil let cook half way then flip and cook the other half of the chicken breast
  8. Repeat until all breast are done

Oct 1, 2010


This recipe was a huge hit in our house. Not only was it fun to make, but it was fun to eat too, and it puts a different spin on Jell-O. We have made several different versions since discovering this recipe. It doesn’t matter the flavor of the Jell-O or the fruit you put inside because this recipe will be a hit! I suggest making it up several days before you need it because it takes a bit of time to set.

I love making it for Thanksgiving. Cranberry juice with cranberries, apples, and pineapple. Not that is a delicious recipe for fun food!

Ingredients:
·         2 small packages of Raspberry Jell-O (I used black cherry)
·         2 cups boiling water
·         8 oz. can of crushed pineapple
·         1 can of whole cranberry sauce
·         1/2 cup red wine (I guess you could substitute grape juice)
·         1/3 cup chopped walnuts

Directions:
  1. Mix it all (except for the nuts) together and pour into a mold.
  2. Refrigerate.
  3. Sprinkle with the walnuts when Jell-O starts to set, but isn't firm (after an hour or two, so they don't sink to the bottom
  4. Serve and enjoy!

Print Friendly and PDF
Check Out Our Online Recipe Book: www.CafeChatterbox.com

Blue Star Applicances and Ranges

Enter your email address:

Delivered by FeedBurner

Popular Posts

Blog Archive